Friday, May 16, 2014
Karinas Crustless Quiche with Roasted Vegetables

Karinas Crustless Quiche with Roasted Vegetables Recipe
Ingredients:
Light olive oil, as needed
2 cups roasted veggies: broccoli, cauliflower, sweet potatoes, onions
1 cup shredded Swiss, Jarlsberg or sharp cheddar cheese
4 large organic free-range eggs
2/3 cup light cream
A dash of nutmeg
1-2 tablespoons chopped fresh parsley, if desired
1-2 tablespoons shredded Parmesan for the top
Pre-heat the oven to 375ºF. Lightly oil or butter a nine-inch glass pie plate
 .
.Serves 4 to 6.
All images & content are copyright protected, all rights reserved. Please do not use our images or content without prior permission. Thank you.

Tuesday, May 13, 2014
Pasta with Sausage and Broccoli Rabe

I know, I know, Ive been a bad girl. I havent posted a recipe in weeks! Ive been pretty busy with parties and showers and all kinds of things going on. All happy celebrations so I dont mind it. With all the craziness that went on I did remember to snap a photo so I could blog about this wonderful dish. I made this for Steves Aunts Baby Shower last week and everyone liked it which makes me very happy!
Before I go on to post this recipe I just want to say Congratulations Melissa and Salvatore and Congratulations to Dana and Lenny!!! Both couples will be parents for the very first time!!!
Okay so here goes...its really very easy and you can add as much or as little garlic as you like or even use hot sausage or a mixture of sweet and hot. This recipe was written to feed a crowd but you can certainly make this for one pound of pasta and use only one bunch of broccoli rabe and half the amount of sausage. I hope you like it! Id love to hear your variation on this very popular dish so feel free to comment!
Pasta with Sausage and Broccoli Rabe
Ingredients:
1 lb sweet Italian sausage (6 links)
2 bunches, broccoli rabe
4-5 cloves garlic
Extra Virgin Olive Oil
Crushed red pepper, to taste
Salt and peppr
Romano cheese, to taste
2 lbs pasta
Directions:
1. Remove stems from broccoli rabe and discard. Cut into bite sized pieces.
Boil broccoli rabe in a large pot of salted water for about 8-10 minutes. Drain (reserve 2 cups of water) and put into an ice cold water bath to stop the cooking process and set aside.
2. While broccoli rabe is cooking, remove sausage from casing and crumble. Saute sausage in oil with garlic and red pepper, constantly breaking it up. Once sausage is cooked add in broccoli rabe and toss to coat with oil. Let it cook together with a few minutes so the broccoli rabe picks up the flavors. At this point you can refrigerate overnight or until ready to cook the pasta.
3. Boil pasta (chose one that won’t fall apart such as orrechiette, cellantani, cavatappi, etc.) in salted water while reheating sausage and broccoli rabe mixture. Add some reserved water from the broccoli rabe to moisten the mixture. Add cooked pasta and toss while continuing to add more water as needed. It shouldn’t be soupy but should not be dry. Toss with cheese and a little more extra virgin olive oil.
Enjoy!
Monday, May 12, 2014
Piquillo Peppers stuffed with Orange and Cumin Scented Goat Cheese Welcome to the Wonderful World of “Tapas!”
 I LOVE tapas! Here is the Wikipedia definition: Tapas (pronunciation: TAH-pas) are a variety of Spanish appetizers, such as mixed olives, cheeses, or an elaborate creation like battered and fried baby squid. In Spain, tapas are usually given for free to accompany a drink before dinner. In the United States and the United Kingdom, tapas have evolved into an entire cuisine where patrons order many different small Spanish dishes and combine them for a full meal.
Well, this clip you’re about to watch is my favorite all-time tapas plate. The amazing Piquillo pepper stuffed with cumin and orange scented goat cheese. Words really don’t do it justice. By the way, these just aren’t any roasted red peppers. They are the world famous piquillo peppers!
They’re sweet, slightly piquant, and unlike anything you’ve had before. They come from the Ebro River Valley, in Northern Spain. They are slow roasted over charcoal, where they lose almost 60% of their weight in water, which results in their legendary intense flavor. Find these! And eat these! These are very common in any decent gourmet store or of course online.
By the way, I’m going to show you how to make the Almond and Parsley Salsa Verde that I top these with in another post.
Sunday, May 11, 2014
ROASTED BRUSSEL SPROUTS with BACON
In all fairness, I have to admit that I copied moms method of overcooking vegetables for many years. Recently, I discover roasting fresh vegetables in the oven. The texture difference is excellent and the vegetable flavor is intense. It is such an easy method of cooking, I cant believe it took me so long to try it!!

The measurements in this recipe are totally flexible; it is more of a roasting description than a recipe. If you are preparing more than 2 pounds of brussel sprouts, just increase the amount of bacon and onion a little; the roasting time will remain the same.
2 pounds of fresh brussel sprouts
½ cup chopped onion
6 slices of bacon fried and crumbled
salt and pepper
Wash brussel sprouts and drain well. Cut off the hard stem and peel off the outside layer of leaves. Cut them in half and set aside.
Fry bacon until crisp and remove from pan and drain well. Remove all but 2 tablespoons of bacon grease from the frying pan. Saute the chopped onion in the reserved bacon grease and use the moisture from the onion to deglaze the bacon bits from the bottom of the pan. Cook the onion until it just starts to turn transparent.
Put prepared brussel sprouts and crumbled bacon back into the pan (with the onion) and toss to coat the sprouts evenly with bacon grease, add salt and pepper.
Place everything in a 9x13 baking dish and roast uncovered, at 400F for 25-30 minutes.
Thursday, May 8, 2014
Warming Up with Beef Merlot

In the meantime, I hope you enjoy this video recipe for beef merlot that I posted a few years ago. It’s an easy take-off on beef bourguignon, and one of my all-time, cold-weather favorites. Be sure to read the original post here, to find out why the heck I used merlot. Enjoy!
Monday, April 28, 2014
Wild Duck with Orange Sauce

The complaints I mostly found for cooking wild duck is that it can taste fishy and/or tough. The "fishy" taste varies from species to species, depending on the birds diet. This is especially true for fish-eating ducks. There are a few ways to tame this taste, but one popular way is to use fruit. The acidity helps to mellow the flavor.
Wild duck should also be cooked only to medium-rare, and not recommended anywhere beyond that. Unlike farm-raised duck and even venison, wild duck is much less forgiving if pushed too far.
So weve been scratching our heads about a duck recipe, but did not want to do the usual wrapped-in-bacon bore. Its been a challenge for us, having run into the usual obstacles described above. But I think we have a winner here. The spices go great with the duck and the orange sauce adds a kind of balance.
Orange Sauce:
- 1 tbs. cornstarch
- 1 cup orange juice

2. Assemble the seasonings. Chop the chives, like so. In a small bowl, mix together chives, poultry seasoning, parsley, garlic salt and cinnamon.


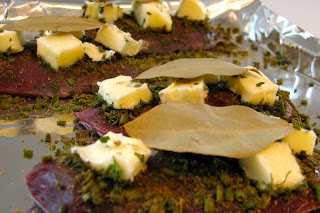


8. Half an hour into baking, combine sugar, nutmeg, cornstarch and a little bit of the orange juice in a small sauce pan. Mix well. Then add the rest of the orange juice.

Wine suggestion:
Sides:
- Wild Rice
- Brussels Sprouts
Please let us know what you think about this recipe by leaving comments. Just click on the red "comments" button below and it will lead you to a form. We value your feedback. Thanks!
Sunday, April 27, 2014
Penne with Sausage and Beef Ragu

2 cans crushed tomatoes
1 medium onion, diced
4 cloves garlic, finely chopped
1 lb ground beef
1 lb ground sausage meat or 6 sweet sausage links removed from their casing
6-7 basil leaves (or 2 frozen cubes)
salt and pepper
garlic powder
Mrs. Dash Table Blend
Extra Virgin Olive Oil
1 tsp sugar
Directions:
Break up sausage with you fingers and add to a preheated pot with 1 tablespoon oil. Add ground beef. Saute beef ans sausage until browned. Sprinkle with garlic powder, Mrs. Dash, salt and freshly cracked black pepper. Use a potato masher or wooden spoon to break up the meat so you dont have any large chunks. Drain oil from meat and set aside.
Saute onion and garlic in EVOO. Return meat to pot and add tomatoes. Swish water in the cans and add about ½ can of water or as needed so it’s not too thick. Season with salt and pepper to taste and add basil. Let cook for ½ hour, stirring occasionally so sauce does not burn. Taste again for seasoning. Add 1 tsp of sugar or a little more if needed. Allow sauce to cook for ½ hour more and taste again.
Serve over your favorite pasta.
Click here for a Printable Recipe of Sausage and Beef Ragu.

Friday, April 25, 2014
Salmon with Hoisin Barbecue Sauce

Turkish Lentil Soup with Mint
One of the reasons we ate so much soup in Turkey was the Unfortunate Chicken Incident. We had left one town very early in the morning, skipping breakfast. When we were set up at a hotel in the next town, we went out and wandered around. When we saw a restaurant with chickens cooking on a rotisserie, we decided to have an early lunch. I ignored the little voice in the back of my head saying, "Who has cooked chickens by 11:30 in the morning? I hope they arent left from yesterday."
You guessed it. They almost certainly were, and had not been handled properly in any case. After that we spent most of the next week on the çorba diet. The çorba diet, as you may suppose, consists of çorba; çorba for lunch; çorba for dinner, and yes, çorba for breakfast. You can nibble on a little of the bread that comes with it if you want, but you mostly wont want.
We noticed, in one bus terminal we had breakfast in, that we werent the only ones having it for breakfast. In fact everyone in that cafe ignored the sad little breakfast plates in the glass display case, and ordered soup and tea. Its a perfectly civilized way to start the morning, and we may start doing it regularly even though our tummies are now fine.
6 to 8 servings
1 hour prep time, better served next day

1 large onion
1 large carrot
2 tablespoons butter
1 cup red lentils
1/3 cup dried tomatoes
2 tablespoons sweet Hungarian paprika
OR 1/3 cup dried sweet red peppers
1/2 teaspoon cumin seed
1 1/2 teaspoons salt
6 cups water
1/4 cup fresh mint
OR 1 tablespoon dried mint
lemon wedges to serve
Peel and chop the onion and carrot. Heat the butter in a large skillet over medium heat, and cook them gently in it until they are soft, about 5 to 10 minutes. If you are using the paprika, add it about halfway through this process.
Meanwhile, put the lentils, dried tomatoes, dried peppers if using, dried mint if using, cumin and salt in a large soup pot. Add the water and bring to a boil. Reduce the heat and simmer for about 45 minutes, until the lentils are very soft. Add more water if the level drops noticeably.
When the onions and carrots are ready, add them to the soup as it cooks.
Let the soup cool, and purée it in a food processor or blender with the fresh mint, if using. It will take 2 patches, Im sure. To serve, reheat the soup and pass a wedge of lemon with each bowl to be squeezed in. As ever with legume-based soups, it gets better after sitting in the fridge for at least a day.
Last year at this time I made Vietnamese Beef and Carrot Stew (Bo Kho) and Smoked Salmon or Trout Loaf.
Wednesday, April 23, 2014
Spring Pea and Stellette Pasta Salad with Fresh Mint and Parsley – We’re reaching for the Stars
 This simple spring pasta salad is a lesson in culinary restraint. There are so many things we could add to this, but we’re not going to do it. I want to celebrate my tender and sweet spring peas, and delicate star-shaped pasta (Stellette) in a simple salad, and I’m not going to clutter it up trying to clean out the vegetable bins. Everything about this salad is subtle. The tender peas barely get cooked by sitting in the hot pasta for a few minutes. The dressing is nothing more than some lemon and oil. I finish with some fresh mint and parsley, salt and pepper and I’m done. Just stop and back away from the salad. There are many magical food pairings, but one of my personal favorites is mint and fresh peas. There is just something about those two ingredients getting together that makes both shine above and beyond what they are capable of alone.
Sure, usually pasta salads are a great excuse to chop up and use all those forgotten veggies in the bottom of the fridge yearning to be free, but not this one. Save that one for the company picnic. Today’s recipe is you and your lover, sitting on a blanket somewhere fresh and green, enjoying this and several others of life’s simple pleasures.
Ingredients:
8oz Stellette pasta
1/2 cup spring peas
1/4 cup fresh lemon juice
1/3 cup olive oil
1 tsp salt
1/2 tsp black pepper
1.2 tsp cayenne pepper
1/4 cup chopper fresh mint
1/4 cup chopper fresh Italian parsley
*don’t forget to salt the water you boil the pasta in!
Friday, April 18, 2014
SANDRAS MOROCCAN CHICKEN with SAFFRON and PITA TRIANGLES
 |
| A ethnic dish that has a complexity of flavors, spices, and textures that compliment each other, which you are simply going to love... |
Prep: Marinade 2 hrs. |
Cook: 1 Hr. - 15 Mins.
Posted by Sandra
INGREDIENTS
4 bone-in, skinless chicken breasts
***Marinade
½ teaspoon ground pepper
½ teaspoon cinnamon
2 garlic cloves, quartered
1 teaspoon kosher salt
1 tablespoon fresh lemon juice
2 tablespoons olive oil
***Sauce
1 tablespoon butter
1 tablespoon olive oil
1 large onion, finely chopped
2 garlic cloves, minced
½ teaspoon cinnamon
½ teaspoon fresh ginger, grated
½ teaspoon kosher salt
½ teaspoon ground pepper
1 (15 oz. can) diced fire-roasted tomatoes, drained
¼ cup calamata olives, quartered lengthwise
1 cup low-sodium chicken broth
Pinch saffron threads (soaked in ¼ cup hot tap water)
2 tablespoons honey (for recipe, click here: Sandras Homemade Alaska Fireweed Honey)
1 tablespoon fresh lemon juice
***Garnish & Serving Options:
2 tablespoons slivered almonds, toasted (for garnish)
2 tablespoons fresh cilantro, chopped (for garnish)
2 to 4 slices of pita bread, each cut into quarters, forming triangles for serving
METHOD
Combine the chicken with the marinade ingredients in a shallow non-reactive baking dish, covered, and leave in refrigerator to marinate for two hours.
Drain the chicken, and pat dry with paper towels, and remove all the garlic pieces (or else they will burn during the following searing process.) Melt the butter and olive oil in a dutch oven over medium-high heat, and add the chicken and sauté, until golden brown on all sides, about 5 to 7 minutes. Remove the chicken to a plate and cover with foil, and set aside.
Meanwhile, place the saffron threads into 1/4 cup of hot tap water, and set aside to let soak for 20 minutes (reserving both liquid and threads). In a small dry and nonstick skillet, toast the pine nuts over low heat, just until fragrant, and set aside to cool.
After chicken is seared, reduce the heat under dutch oven to low, and add the onion to caramelize by slowly cooking, stirring often, until onions are golden brown, about 20 minutes. Add the garlic, cinnamon, ginger, kosher salt, and pepper and cook 1 minute. Add the tomatoes, and cook for 5 minutes. Add the black olives, chicken broth, saffron with soaking water, honey, lemon juice, and the reserved chicken (including any juices the chicken has given off on the plate), and bring to a boil, then reduce heat to a simmer and cover the dutch oven for 20 minutes. Remove the cover and continue simmering to reduce the sauce for another 15 minutes. Taste sauce for seasonings, adding kosher salt and ground pepper, if need be.
Serve the Moroccan Chicken on a rimmed platter, and garnish with toasted almonds and cilantro, including placing pita triangles along the perimeter for sopping up the sauce (BTW: This dish is meant to be eaten with clean fingers and pita bread as your utensils. – Enjoy!
~~~~~~~~~~~~~~~~~~
Tips: For an even heartier meal, you might also wish to serve this dish with couscous, orzo, or steamed rice.
Also, most moroccan recipes call for raisins to be added at the end of the cooking process, although I do not particularly care for them, but feel free if you choose to do so ;-)
Tuesday, April 15, 2014
Blue and Green Soup with Gluten Free Cheese Scones

The No Waste Food Challenge run by Kate at Turquoise Lemons also asked us to use up left over Fennel. Now, I love fennel and rarely have any left over, but it was a good excuse to go and buy some so I have included at little of it in this recipe.

Put the oil in the pan at a medium heat, add the onion and saute for about 5 minutes until soft. Add the chopped broccoli.


Gluten Free Special Scones
225g White self-raising Gluten and Wheat Free flour
1 level tsp gluten free baking powder
50g Pure Sunflower dairy free margarine
1/2 tsp Colemans mustard powder
50g grated cheese
1 egg
milk or natural yogurt
Heat the oven to 220C and lightly grease a baking sheet
Put the flour and baking powder in a bowl and add the margarine, rub it in with your fingertips until the mixture resembles fine breadcrumbs. Stir in the mustard powder and the grated cheese.

Turn onto a lightly floured table and pat out to about 1.25 (1/2 inch) thickness.
Cut into rounds, I made my big as we were having them as rolls with our soup. Place spaced out on the baking sheet and brush the tops with milk or yogurt and sprinkle with a little more cheese.
 |
| Im showing you this so you can see how thick they are cut. |
Bake in the oven for about 10-15 minutes (depending on how big you made them) until they are pale golden brown. Remove and leave to cool on a wire rack.

Not only was the soup good, although dominated by the broccoli and blue cheese flavours, but the scones were excellent. A little more chewy in texture than the wheat flour ones, but definitely good and a very acceptable substitute. They could also be adapted to be dairy free by using substitutes for the milk/yogurt and cheese.

Sunday, April 13, 2014
Cannellini Beans with Eggplant Patlıcanlı Kuru Fasulye

A great twist to a very traditional recipe: white beans, which are generally referred to as the national dish of Turkey.

1 medium size eggplant, diced
1 cup of dry cannellini beans, soaked over night or 1 can of cannellini beans
1/4 lb stew beef [for a meatier stew you can use more stew beef and for a vegetarian version skip it completely]
1 big onion, diced
3 cloves of garlic, minced
3 tomatoes, diced or 1 can of diced tomatoes
1 red bell pepper, finely chopped
2 green chilies (slightly spicy anaheims?), finely chopped
3 tbsp butter
frying oil, ~1/2 cup
salt
red pepper flakes
-Heat frying oil in a pan and fry eggplant until golden brown. Let fried eggplant cubes soak on a paper towel. If you want to keep the oil level low, you can bake the eggplant in stead of frying. Brush an oven tray with oil and place eggplant cubes. Bake ~20-25 minutes at 390F.
-Heat butter in a pot. Add onion and garlic. Stir until soft.
-Add pepper and stew beef. Cook until beef releases and then soaks its juice.
-Add diced tomatoes, 1 cup of hot water, salt, and red pepper flakes--optional, [and if you are using dry beans, add them now, too.] Cook for 30 minutes.
-Add fried eggplant cubes and beans [if you are using canned beans] and cook for another 15-20 minutes on low-medium.
-Serve hot with crusty bread and rice.
Wednesday, April 9, 2014
Cooking Spagetti with salsa

Ingredients:
Spagetti/ Noodles-150 grms (dry weight)
Vegetables (you can prefer any one that you like, here I list the one I took)
Potato chopped in to long pieces-1/4 cup
Onion chopped-1/4 cup
Spring onions chopped-1/2bunch(5 springs)
Capsicum chopped-1/2cup
Pepper powder-1/2ts
soy sauce-2ts
Carrot-1 chopped
cilantro- chop nearly 10 springs
Salt to taste
Salsa(Mild)- 4tbsp
Green chili/ peppers-1 large
vegetable oil-3ts
shredded cheese-1ts (optional)

- Take a pan and fill 1/2 a volume of it with water and bring them to boil, add little vegetable oil and very little salt and cook noodles.
- Turn off the stove when the noodles are done cooking, and transfer the noodles to the bowl containing Cold water and keep them aside.
- Now take a skillet and heat 2 ts of vegetable oil, add all vegetables mix and close the lid.
- Saute them in regular intervals under medium flame.
- When all vegetables are cooked add noodles and mix well.
- Add soy sauce, salsa, salt and pepper to taste and mix well..
- Finally add cilantro and turn off the stove, sprinkle some cheese on top and serve hot with cheese/ lemon juice.
Tuesday, April 8, 2014
Gluten Free Cornbread with Green Chiles Cinnamon
 |
| Tender moist gluten-free cornbread you can bake in a skillet or a cake pan. |
Read more + get the recipe >>
Tuesday, April 1, 2014
Twofer Thursday AWARD and Mango Habanero Wings with Blue Cheese Dipper


Saturday, March 29, 2014
Creamy Penne Pasta Bake with Zucchini
 |
| A light and creamy pasta bake recipe for Spring. |
Mac and cheese gets a makeover. Just in time for swimsuit shopping
 (also affectionately known around here as the annual Parade of Shame). It's time to start cooking light again, and give your body a break from all that white rice pasta, butter, and double cheese. It's time to kiss bacon good-bye. Hot weather is coming, Babycakes. The beach and poolside beckon. And I am not prepared. Are you?
I've been lax with my downward facing dogs (actually, I'm forbidden to do downward facing dogs these days, but that's another story). My lumbo-pelvic complex is cranky. My core is catnapping. And my biceps need curling. Or something like that. What it basically means is I've got some flab I need to banish. Remember that roll around my middle I call Doris? She's still here. She has not skedaddled. My usual winter weight gain of five hibernation pounds is eight this year.
I could blame those Raspberry Coconut-Almond Bars my husband keeps making (he who can eat cookies and brownies and still sport flat abs). I could blame fructan and fructose, and various unfriendly members of FODMAPs who may be the bottom line bloat culprit in my ongoing emulation of my halcyon pregnancy days (those of you with IBS symptoms despite going gluten-free might want to look into this fructose and polyol thing- it appears to have some merit).
But mostly I blame how much time I spend on the iMac. Sitting. Typing. Sitting some more. Social networking. The Internet is an amazing gift. But it is damn hard on the body. I'm vowing to get up and move more frequently. Shake my booty. Feel the burn. Or at least feel some heat.
So just in case you're in the same mood, too. I've made a lighter version of the classic baked mac and cheese.
I used gluten-free brown rice penne with rice bran for the pasta. Organic soy milk and Smart Balance vegan "butter" for the cream sauce. Zucchini and garlic and chives for a flavor boost. And it was fab. Light. Creamy. Perfect for Spring.
Read more + get the recipe >>
Monday, March 24, 2014
Quick Besan Burfi with Condensed Milk
 |
| Besan Burfi with Condensed Milk |
Besan/ Kadalai Maavu - 2 cups
Condensed Milk - 400 gms
Ghee - 8 tbsp
Cardamom powder - less than 1/4 tsp
 |
| Easy Besan Burfi |
1. Roast besan flour with ghee in a pan for 15 mins on low heat until raw smell leaves.
2. When besan flour is well roasted add cardamom powder and condensed milk to the pan.
3. Keep stirring until mixture thickens and forms to big mass leaving sides of pan.
4. Transfer mixture to greased plate and cut into desired shapes.
5. Allow completely to cool and enjoy.
 |
| Besan Burfi |
Wednesday, March 19, 2014
Karinas Vegan Coleslaw with Peanut Dressing
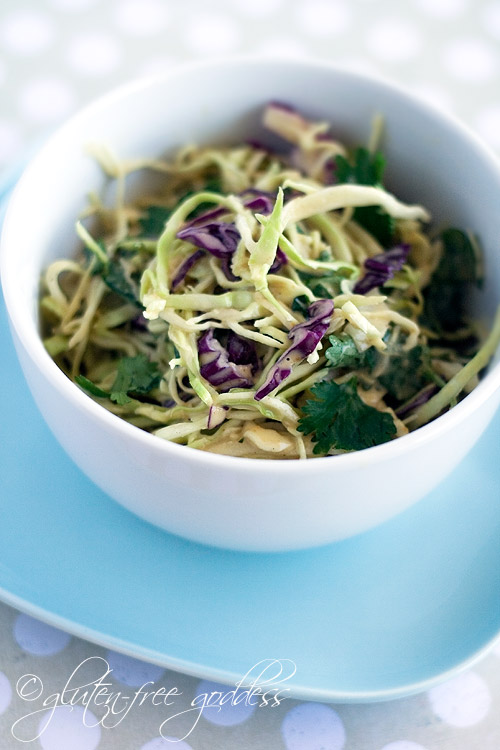 |
| Crunchy cool vegan slaw with a light peanut dressing. |
Read more + get the recipe >>
