Friday, January 31, 2014
HIWWI Stubbs Wootton Slippers

{Stubbs & Wootton Bespoke Slippers, $475}
I dont know what it is with me and flats lately! Maybe my subconscious is aware of some kind of impending bunion or hammertoe development and is willing itself over my fashion choices. Whatever it is, its irrelevant, because Ive recently discovered Stubbs & Wootton. Have I been living under a rock?? Apparently, Stubbs & Wootton pump out hand-made shoes in a variety of styles from Palm Beach, NYC, and South Hampton.
While many of their wares look like an old mans night slippers, best paired with a smoking jacket, they have a bespoke section which allows you to build your own custom pair, choosing everything from the color to the embroidery on the toe. The masterpiece you see above is the pair I dreamed up. Theyre pink, and velvet, and adorned with seahorses--they should basically be hanging in the Louvre next to the Mona Lisa.
Preppy is

{ASOS pants, $47.57}
Yes, I realize theyre a different shade of pink. Thats all part of the fun...if you dont get it, then take the fun trains next stop to Lame-town!!

{Equipment blouse, $110.60}
Owning an Equipment blouse (or 8) is on my bucket list. Theyre known for their fabulous construction and fit and they feel like a babys bottom. I know this not because I know what a babys bottom feels like, but because I rubbed my face on a shirt in Neimans once. It wasnt my finest moment, but I dont regret it. I like this berry-colored one.
By now, you already look like a bottle of Pepto...no need to tone it down now. Go balls to the wall with this color-block purse:

{Jeffrey Campbell bag, $55}
Round out your homage to a flamingo with a swipe of bright pink lipstick and go find a dimly lit room to light up!

{NARS lipstick in Schiap, $24}
So, have you heard of Stubbs & Wootton? Would YOU rock an entirely pink look?? Do you think Ive gone insane endorsing flats??? Tell me everything in the comments!!
Boondi recipe
Indian evening crispy snacks. These are the bundhi/bundi that I saved while making bundi laddu. I love this crunchy snack with yogurt rice. In all traditional parties in India this recipe is common.


Ingredients
Besan/ senaga pindi- 2 cups(1 cup=160ml )
Oil for deep fry
Salt to taste
Red chili powder to taste
Directions:
Mix 2 cups of basin with water (app~2cups). The consistency of batter should be like a butter milk. Now heat enough oil for deep fry in a pan. Now Take laddle and pour 1 big spoon full of batter on to laddle by holding it onthe top of oil, now the batter falls like small droplets from the holes in the laddle. Fry this droplets, till they turn golden brown. Add them to the sugar syrup. Continue this process till the batter is finished.An Early Spring Lunch
Today for lunch, Michele fried some sweet Italian sausage and served them on toasted, garlic-rubbed bread. Next to it was an ordinary green salad, made extraordinary with her kumquat and blood orange dressing. It was a perfect early spring lunch.

Zucchini Hummous
This is a ridiculously simple and tasty little thing to do with zucchini. I first heard about it 3 years ago when my mother made it, and I declared I would do it myself too, soon. Well, soon is a relative term, I guess. Weve been struggling to getting our zucchini plants to produce, which is a laughable problem given their reputation. However, I managed to round up enough this week to give it a go. It does taste a little lighter than regular hummous, but is otherwise surprisingly similar. Just the thing for a light summer meal.
about 2 cups - 4 servings
20 minutes prep time

1 medium zucchini (2 cups diced)
2 tablespoons olive oil
1/4 cup tahini
1 small clove garlic
2 to 3 tablespoons lemon juice
1/4 teaspoon salt
1/4 teaspoon cumin seed, ground
a sprinkle of paprika, a grind of black pepper
Wash and trim the zucchini, and cut it into dice. Put it in a blender or food processor with the remaining ingredients and purée until smooth, stopping to scrape down the sides if necessary. Give it a taste and adjust the flavours if you think it needs more of anything. (Less? Sorry; too bad.)
Remove to a serving dish and let rest for 30 minutes or so to allow the flavours to blend. Serve with crackers or crudités. I dont know how well this keeps; the issue has never arisen.
Read More..
about 2 cups - 4 servings
20 minutes prep time
1 medium zucchini (2 cups diced)
2 tablespoons olive oil
1/4 cup tahini
1 small clove garlic
2 to 3 tablespoons lemon juice
1/4 teaspoon salt
1/4 teaspoon cumin seed, ground
a sprinkle of paprika, a grind of black pepper
Wash and trim the zucchini, and cut it into dice. Put it in a blender or food processor with the remaining ingredients and purée until smooth, stopping to scrape down the sides if necessary. Give it a taste and adjust the flavours if you think it needs more of anything. (Less? Sorry; too bad.)
Remove to a serving dish and let rest for 30 minutes or so to allow the flavours to blend. Serve with crackers or crudités. I dont know how well this keeps; the issue has never arisen.
Breaking News Food Wishes Nominated for Saveur Magazine 1st Annual Best Food Blog Awards!
 Thank God for Twitter! Im sure I would have found out eventually, but I saw a tweet this morning congratulating me on being nominated in the video category for the Saveur Magazine 1st Annual Best Blog Awards! I had no idea, and quickly went to make sure I wasnt being punkd…it was true!
I know youve all been amazingly supportive in the past when asked to go and vote for me for various awards and recognitions, and I hope I can count on you again! Saveur Magazine is quite a prestigious foodie publication, and any recognition I get there would be huge for the future success of this blog.
Please go to the main awards page to vote. I havent even read the rules/dates/prizes etc. but I will later. If you see anything you think your fellow foodwishers need to know feel free to chime in. Thanks!
Thursday, January 30, 2014
Bang Bang Shrimp Recreated at Home

Bang Bang Shrimp is certainly a favorite of diners at Bonefish Grill and it is something I regularly crave as well. Being concerned, as most are, that fresh USA Gulf shrimp may soon be difficult to come by, I decided to take advantage of the beautiful 10-15 counts which were available at the supermarket. The Bang Bang Shrimp dish served in the restaurant is generally small popcorn shrimp lightly coated in corn starch and fried. I choose to make mine with a heavier batter and panko for my gigantic version.
I combined 1/2 beer with some corn starch, flour and salt and pepper. After cleaning and deveining the shrimp I gave them a batter bath and then coated them with panko bread crumbs. I pan fried the little beauties for about 3 minutes per side or until they were golden brown and crunchy.
Meanwhile, I made the defining sauce for my Bang Bang shrimp by combining mayonnaise, Srirachi hot sauce, sweet hot pepper sauce, and rice wine vinegar in a very large mixing bowl.
As the shrimp came out of the fryer, the were immediately dunked and tossed in the perfectly pink spicy sauce. Serve them over a bed of cold, crispy shredded iceberg lettuce with a sprinkle of sliced green onions and chopped cilantro and it really is one of the tastiest treasts to tickle (and heat up) your taste buds!
Spongy Idlies South Indian Idli

There can never be a chettinad breakfast being served without idly .It always forms the main course in the breakfast. Chettiar ladies are always good at making soft idlies.Though simple many things has to be taken care of right from the selection of rice, soaking the ingredients, grinding ,mixing and storing the grinded batter for a few days etc etc.
Ingredients
Boiled rice-4 cups
Urad dhal(black gram) -1 cup
Fenugreek seed-1 teaspoon full
Selection of rice and urudh dhal
Boiled rice which are little fat and small in length compared to other rice will be good for idlies.In different areas they call it by different names.(Kattai vellai,Ponmani and so on).while going for urudh dhal always try to get whole white dhal which will give more dough than the broken ones. People who live abroad have no other go than to get the idly rice from the Indian stores. Remember the brand name of the rice that give good idlies and go for it the next time you buy rice for idly.
Soaking
Rice should be washed nicely and soaked at least for 2 hours. No harm will be done if rice is soaked long
Trick of making soft idlies depend much on urudh dhal soaking too.
Dhal should be soaked only for 45 minutes. Over soaking will reduce the quantity of batter
Wash the dhal nicely and pour 3 cups of water and soak. Add the fenugreek seed to the dhal Use the water in the soaked dhal for grinding. If you are not able to grind after soaking keep it in the refrigerator and take out 15 minutes before grinding.
Grinding
Grinding the dough in the grinder will always be the best. But the bachelors who won’t have grinders have to depend on the mixies.Sumeet mixie is my choice for grinding.
While grinding in the mixie urudh dhal should be grinded carefully. Never allow the jar to be heated. Ice water can be used for grinding which will help the batter to be cold. Add water 2 to 3 times and grind the dhal to a fine paste.Dont pour all the water in the beginning itself. I always find it better if the rice is also grinded to a smooth paste. But I have read in many places that rice should not become a smooth paste. Many have doubt in the order of grinding. Mostly people grind urudh dhal first since cleaning the grinder after grinding rice will be easy. I don’t think the order of grinding does any difference to the quality of idly.
Mixing the batter
Add the salt needed for the batter (for 4 cups of rice 3 table spoons of salt) in little water pour it into the batter and mix it well upside down for 5 minutes. Much depend on mixing also. Keep the batter in a big container and mix.
Storing
After mixing the batter transfer it into 2 to 3 containers .See to it that the containers are filled only three fourth the capacity. Allow space for fermenting. Ferment it by keeping outside for 6 to 8 hours according to season in tropical countries. In western countries it can be fermented in their own ways. After fermenting refrigerate it. I always find Tupperware boxes best suited for storing since it retains the consistency till the last day of use.
If the quality of urudh dhal you use is excellent then idlies will become flat. In that case reduce the amount of urudh dhal next time. If the dhal is very bad in quality or the batter is mixed to a thicker consistency idlies will become hard. In that case next time use a little more dhal .Make sure the consistency of the batter is neither too watery nor too thick.
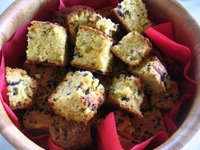
Savory Cornmeal Cake Mısır Ekmeği
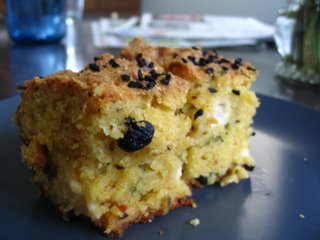
Corn meal or corn flour cake was something my mom used to bake for a lazy weekend breakfast once or twice a year. It was always a special cake not only because it was delicious but also because it wasnt something we had all the time. Corn flour my mom used for the cake came from my dads hometown, a small town in the Black Sea Region. My aunt would bring it back after visiting her relatives.
I recreated the recipe not with Black Sea Region corn meal, but with Indiana Spring Mill State Park corn meal. I called my mom for the details and since in her explanation she used "coffee mug" instead of "cup" as measurement, measurement for this recipe will be a coffee mug. If you pick the most ordinary coffee mug and measure everything with the same mug, youll be fine.
2 coffee mugs of corn meal
1 coffee mug flour
3 eggs
1 coffee mug yogurt
3/4 coffee mug oil (corn or sun flower-if you use olive oil it might make the cake bitter)
2 tsp baking powder
salt
1 cup of feta cheese, crumbled
1/2 cup black olives, pitted and sliced
1 tsp pepper flakes
1/2 bunch parsley or dill, chopped finely (if you dont have parsley or dill, you can use thyme)

-Beat the eggs in a bowl and add all the ingredients. Mix well.
-If the dough seems too dense, lighten it up by adding a little more yogurt or milk. This shouldnt be a dense cake.
-Grease the owen dish (I used a 2 inch deep 8.5 x 11.5 inch one)
-Put the dough in the owen dish. Sprinkle black seeds on it if you wish.
-Bake approximately for an hour in a preheated owen at 375ºF. After 45 minutes, start checking with a knife every 10 minutes. When the knife comes out clean, the cake is baked.
This recipe is for Meetas Monthly Mingle.
I recreated the recipe not with Black Sea Region corn meal, but with Indiana Spring Mill State Park corn meal. I called my mom for the details and since in her explanation she used "coffee mug" instead of "cup" as measurement, measurement for this recipe will be a coffee mug. If you pick the most ordinary coffee mug and measure everything with the same mug, youll be fine.
2 coffee mugs of corn meal
1 coffee mug flour
3 eggs
1 coffee mug yogurt
3/4 coffee mug oil (corn or sun flower-if you use olive oil it might make the cake bitter)
2 tsp baking powder
salt
1 cup of feta cheese, crumbled
1/2 cup black olives, pitted and sliced
1 tsp pepper flakes
1/2 bunch parsley or dill, chopped finely (if you dont have parsley or dill, you can use thyme)


-Beat the eggs in a bowl and add all the ingredients. Mix well.
-If the dough seems too dense, lighten it up by adding a little more yogurt or milk. This shouldnt be a dense cake.
-Grease the owen dish (I used a 2 inch deep 8.5 x 11.5 inch one)
-Put the dough in the owen dish. Sprinkle black seeds on it if you wish.
-Bake approximately for an hour in a preheated owen at 375ºF. After 45 minutes, start checking with a knife every 10 minutes. When the knife comes out clean, the cake is baked.
This recipe is for Meetas Monthly Mingle.
SANDRA’S TASTY VENISON SALAMI FRIED RICE
 |
| I used homemade Venison Salami our brother in law Larry Harvey recently provided us... |
Servings: (2)
Prep: 5 Mins. |
Cook: 15 Mins.
Cook: 15 Mins.
Posted by: Sandra
INGREDIENTS
2 tablespoons light olive oil, divided
2 eggs
¼ cup yellow onion, diced
¼ cup celery, diced
¼ cup red bell pepper, diced
1 garlic clove, minced
¼ cup venison salami, diced
2 cups pre-steamed basmati rice
2 tablespoons ginger soy low-sodium sauce
¼ teaspoon freshly ground pepper
Garnish:
--1 green onion, sliced
--4 large cherry tomatoes, halved
METHOD
Heat a large skillet over medium heat with 1 tablespoon light olive oil. Beat the eggs in a small bowl. Scramble the eggs while breaking them up slightly, and set aside in a small bowl.
Add the remaining 1 tablespoon of olive oil to skillet and heat to medium-high heat. Add the onion, celery, and bell pepper to the skillet, and saute until onions are translucent, about 5 to 7 minutes. Add the garlic, and saute for 30 seconds. Add the diced venison salami, and saute for 1 minute. Add the rice, and break it up to incorporate with other ingredients while sautéing. Add the soy sauce and freshly ground pepper, and continue sautéing for a couple of more minutes. Lastly, add the reserved scrambled eggs, and saute until warmed through.
Serve equally between two dinner plates, and garnish the fried rice with sliced green onions. Place the cherry tomato halves along side – Enjoy!
Vazhai Thandu Koottu Banana stem curry

As I have mentioned earlier, koottu is an indispensable item in chettinad lunch. Koottu of almost all the vegetables is made. The tastiest among them as far as I am concerned is this vazhaithandu koottu.I hope that all will have some knowledge of the immense medicinal value of this stem.
Due to the high fiber content, It is a well-known remedy for urinary disorders. It improves the functional efficiency of kidney. It clears the toxins in the body and helps to eliminate them in the form of urine. It has been found to be of great help in the treatment for the removal of stones in the kidney, gall bladder, and prostate.
I can understand what is going on in everybody’s mind now. Well, how to cut this? True, cutting and taking the fiber out of this stem is little difficult.If available in the market where you live ,then cutting can be of no excuse for not cooking this. One has to get trained by practice, in cutting the thandu since the regular intake of vazhaithandu is very good for all in the family. Now a days the problem of kidney stones, urinary disorders are on the rise and if we can do something for this from our kitchen it will be great.
Cutting the Thandu
Remove the thick outer portion of the stem and get smooth stem.Make thin round slices, while making each slice slightly rotate your finger from the centre of the slice. If your finger gets hold of a fiber, the rest of the fiber will get wound to your finger (2 seconds for each slice).Put these in a vessel of water mixed with a spoon of curd or butter milk (butter milk will help the thandu to retain its white color).Once all the slices are made, chop them into small pieces, keeping together 5 or 6 slices together. If you hold a small stick like thing inside the vessel having the cut pieces and rotate slowly, the remaining fiber will get wound in that stick
Remove the thick outer portion of the stem and get smooth stem.Make thin round slices, while making each slice slightly rotate your finger from the centre of the slice. If your finger gets hold of a fiber, the rest of the fiber will get wound to your finger (2 seconds for each slice).Put these in a vessel of water mixed with a spoon of curd or butter milk (butter milk will help the thandu to retain its white color).Once all the slices are made, chop them into small pieces, keeping together 5 or 6 slices together. If you hold a small stick like thing inside the vessel having the cut pieces and rotate slowly, the remaining fiber will get wound in that stick

Ingredients
Broken green gram (pasiparuppu)-1 handful (1/4 cup)
Green chili-4
Chopped small onion-10
Curry leaf-little
Small jeera-1 teaspoon
Coconut milk-2 tablespoon
Procedure
Cook the dhal in a big kadai. Once the dhal is well cooked, add the cut vazhai thandu pieces, chili and onion. Add a cup of water. Close the kadai and cook for 10 minutes in slow fire. Open the lid and add little salt (remember that this thandu can’t hold too much salt).Bring to a boil and switch off the stove. Add the coconut milk. Season the koottu with little small jeera and curry leaf in a teaspoon of ghee in a separate kadai and add to the koottu.If you want to store the koottu for the next day, coconut milk can be avoided.
Wednesday, January 29, 2014
Bhutanese Red Rice Kırmızı Pirinçli Butan Pilavı

Rice, whether its white, brown, long, short,
forbidden (black), or red, is one of my favorite dishes. Red rice with its nutty flavor has secured a good place in my heart, and as a result in my kitchen, in the last year. I usually cook it alaturka; however, this time I wanted to try a Bhutanese recipe since red rice is from Bhutan. I found the recipe online here. I only made small changes, and the Bhutanese rice turned out to be great. I served it with Turkish meatballs and they got along pretty well. From now on Ill absolutely cook red rice with this recipe.
1 cup red rice
2 tbsp butter
1/2 bunch green onions, chopped finely
1/2 cup petite diced carrots
1/2 cup finely chopped shitakee mushroom
1/2 tsp thyme
3 bay leaves
1 1/2 - 2 cups vegetable stock (the stock I used was salty, so I didnt use extra salt)
-Wash the rice with cold water and let it sit in warm water for an hour before you cook.
-Heat the butter in a pot, stir in onions, and cook for 4-5 minutes. Add carrots, mushroom, and rice. Stir for another 5 minutes.
-Add vegetable stock (you can also use chicken stock or water), thyme, and bay leaves. First bring to a boil, then put it in an oven dish, cover, and cook in a preheated oven at 450F for 20-30 minutes, until rice soaks the water.
-Let it sit for at least ten minutes before serving.
This recipe is for a Turkish food blogging event called "Pirinç Ye" (Eat Rice) which is hosted by Sonia of Our Beautiful House and Garden.
A really satisfying meal
A meal I had last year at one of Icelands fancier (and most expensive) restaurants, where perfectly done beef was served with braised veal that was well on its way to becoming pâté and had an incredible richness of flavour, reminded me of all the times when, as a child and well into my teens, I would stalk the pot when my mother was making lamb pâté and try to nab a little morsel of braised meat that had been cooked for so long that it was beginning to separate into string-like pieces, each bursting with the flavour of meat, onions and salt and saturated with the special flavour braising gives to meat. Unfortunately for the restaurant, the comparison was not in their favour, because while the braised veal – I think they called it veal mousse although I am relatively sure that neither cream, eggs nor gelatin were involved – had a wonderful, rich flavour, it had a mushy, nasty texture that made it impossible to eat it by itself - you needed a piece of beef, vegetable or potato to hide the texture.
A little later I bought a shoulder of lamb and used a couple of pieces to cook vegetable-lamb soup. After the hour it takes to make the soup, the meat was tough and flavourless and I decided I was probably going to end up making pâté from what remained. But yesterday when I was reading Ruth Reichls book Garlic and Sapphires, the chapter on beef gave me a hankering after meat, and I remembered the braised veal and lamb. I now decided to try to recapture that fascinating, rich flavour, along with the right texture. I had braised meat many times but never taken it to the stage where it begins to fall apart, so this was a first for me.
I started rooting around in the freezer, rejected some cutlets I found, knowing I could get them cooked and tasting good in about 30 minutes, whereas the lamb shoulder, which I dug up next, would be perfect for braising. I took two pieces and put them in the fridge to thaw, then when I came home today I got them out, cut them down to a size that would fit into the smaller of my soup pots, browned them at high heat in a frying pan and flavoured them with salt and pepper, then dumped them into the soup pot with a quartered onion and little bit of water. Once it was boiling merrily I lowered the heat so that it would barely keep simmering, put the lid on and started the timer.
After 20 minutes I opened the pot, saw there was too much liquid and poured off some of it into a jar. Every 20 minutes I checked on the pot and pulled the bottom piece of meat out and put it on top to allow all the meat to wallow in the increasingly flavourful broth, which I replenished from the jar whenever it was in danger of boiling off. After an hour I decided there was some flavour note missing from the broth, so I added a sliced carrot and a bit more salt.
At the 70 minute mark I took the meat and cut it into smaller pieces and returned it to the pot with the bones. I started cooking the potatoes around the 80 minute mark and decided that I needed a second side dish to serve with the meat, so I got out some white cabbage which I sliced into ribbons. When the potatoes were cooked, I got them out and mashed them, adding milk, butter, sugar and a pinch of salt, and then put them aside.
It was now time to start browning the meat. I poured off the broth which by now could well be called stock, so rich and concentrated had it become, turned up the heat to medium and put some butter into the pot, as the meat was rather lean and there was hardly any fat on it to use for the browning. I also put some into a frying pan for the cabbage.
While the butter in the pan melted and got up to the right temperature, I coated the meat in butter and listened to hear the sizzling begin. I dumped the cabbage into the frying pan and stirred it to get it coated with butter, then turned back to the meat. This I stirred to prevent it from sticking to the bottom of the pot and tore it apart with the edge of the wooden spoon and a fork while it browned. To make sure it wouldnt burn or dry out, I occasionally added a spoonful of the stock. At this stage I was taking turns stirring the meat and the cabbage.
When the smell of cooking cabbage began to rise from the pan, I added couple of dashes of maple syrup to it (you need to be very careful with the maple syrup as too much ruins the dish) and a pinch of salt to counteract the syrups sweetness. I stirred the cabbage to coat with the syrup and then removed it from the heat. Then I finished browning the meat, which was now beginning to take on a caramel colour and looked like my mothers pâté meat does right before she puts it into the grinder. The onions had been completely mashed up and absorbed by the meat, but carrot pieces were still visible as tiny morsels of bright orange among the browned meat. I added the final spoonful of broth, gave it a stir, picked out the bones (carefully licking each before discarding it) and then dumped the meat onto a plate, added the mashed potatoes and the cabbage.
And how did it taste? The mashed potatoes were creamy and mild with a hint of butter, the meat was rich and soft with just the right amount of saltiness and a hint of pepper, but the cabbage was a bit bold – which was surprising as raw it had little flavour – but it was perfectly al dente and after the first explosion of flavour it had just the right amount of sweetness and a mild taste of maple to counteract the first big taste shock. I think the most exquisite moment of the meal came when the liquid from the cabbage – equal amounts cabbage juice, butter and maple syrup – seeped into the meat and was absorbed into it, adding a hint of sweetness to it to complement its rich and slightly salty braised flavour. In other words: it was a very, very good meal, in the way only food cooked at home with love and care can be.
I am just hoping the mashed potatoes will prevent me from getting heartburn, but even if I do, it will have been worth it.
Read More..
A little later I bought a shoulder of lamb and used a couple of pieces to cook vegetable-lamb soup. After the hour it takes to make the soup, the meat was tough and flavourless and I decided I was probably going to end up making pâté from what remained. But yesterday when I was reading Ruth Reichls book Garlic and Sapphires, the chapter on beef gave me a hankering after meat, and I remembered the braised veal and lamb. I now decided to try to recapture that fascinating, rich flavour, along with the right texture. I had braised meat many times but never taken it to the stage where it begins to fall apart, so this was a first for me.
I started rooting around in the freezer, rejected some cutlets I found, knowing I could get them cooked and tasting good in about 30 minutes, whereas the lamb shoulder, which I dug up next, would be perfect for braising. I took two pieces and put them in the fridge to thaw, then when I came home today I got them out, cut them down to a size that would fit into the smaller of my soup pots, browned them at high heat in a frying pan and flavoured them with salt and pepper, then dumped them into the soup pot with a quartered onion and little bit of water. Once it was boiling merrily I lowered the heat so that it would barely keep simmering, put the lid on and started the timer.
After 20 minutes I opened the pot, saw there was too much liquid and poured off some of it into a jar. Every 20 minutes I checked on the pot and pulled the bottom piece of meat out and put it on top to allow all the meat to wallow in the increasingly flavourful broth, which I replenished from the jar whenever it was in danger of boiling off. After an hour I decided there was some flavour note missing from the broth, so I added a sliced carrot and a bit more salt.
At the 70 minute mark I took the meat and cut it into smaller pieces and returned it to the pot with the bones. I started cooking the potatoes around the 80 minute mark and decided that I needed a second side dish to serve with the meat, so I got out some white cabbage which I sliced into ribbons. When the potatoes were cooked, I got them out and mashed them, adding milk, butter, sugar and a pinch of salt, and then put them aside.
It was now time to start browning the meat. I poured off the broth which by now could well be called stock, so rich and concentrated had it become, turned up the heat to medium and put some butter into the pot, as the meat was rather lean and there was hardly any fat on it to use for the browning. I also put some into a frying pan for the cabbage.
While the butter in the pan melted and got up to the right temperature, I coated the meat in butter and listened to hear the sizzling begin. I dumped the cabbage into the frying pan and stirred it to get it coated with butter, then turned back to the meat. This I stirred to prevent it from sticking to the bottom of the pot and tore it apart with the edge of the wooden spoon and a fork while it browned. To make sure it wouldnt burn or dry out, I occasionally added a spoonful of the stock. At this stage I was taking turns stirring the meat and the cabbage.
When the smell of cooking cabbage began to rise from the pan, I added couple of dashes of maple syrup to it (you need to be very careful with the maple syrup as too much ruins the dish) and a pinch of salt to counteract the syrups sweetness. I stirred the cabbage to coat with the syrup and then removed it from the heat. Then I finished browning the meat, which was now beginning to take on a caramel colour and looked like my mothers pâté meat does right before she puts it into the grinder. The onions had been completely mashed up and absorbed by the meat, but carrot pieces were still visible as tiny morsels of bright orange among the browned meat. I added the final spoonful of broth, gave it a stir, picked out the bones (carefully licking each before discarding it) and then dumped the meat onto a plate, added the mashed potatoes and the cabbage.
And how did it taste? The mashed potatoes were creamy and mild with a hint of butter, the meat was rich and soft with just the right amount of saltiness and a hint of pepper, but the cabbage was a bit bold – which was surprising as raw it had little flavour – but it was perfectly al dente and after the first explosion of flavour it had just the right amount of sweetness and a mild taste of maple to counteract the first big taste shock. I think the most exquisite moment of the meal came when the liquid from the cabbage – equal amounts cabbage juice, butter and maple syrup – seeped into the meat and was absorbed into it, adding a hint of sweetness to it to complement its rich and slightly salty braised flavour. In other words: it was a very, very good meal, in the way only food cooked at home with love and care can be.
I am just hoping the mashed potatoes will prevent me from getting heartburn, but even if I do, it will have been worth it.
Lime Chicken Taco Fun

Fast + delicious- lime chicken tacos.
Grilling season is upon us. But don't you worry, sweetcakes. This particular gluten-free goddess is not going to waste a heartbeat lamenting hot dog buns. And I'm not going to spend hours in the kitchen trying to replicate hamburger rolls, that even in their wheat loaded incarnation were more of a starchy dry-as-dirt nuisance. Something invented to hold the all fixins' together, but that, when push came to shove, I ended up tearing off piece by piece, peeling around the edges to get to the good stuff.
This was ages before the California In N Out protein style burger was invented (which was, in my humble, wheat-free opinion, sheer, utter low carb genius). Who knew a burger wrapped in lettuce leaves would be so darn tasty? But I digress. Let's get back to the barbecue question.
Are you going to pine for long lost spongy buns?
Read more + get the recipe >> Chicken curry Indian style
 Ingredients:
Chicken(Breast/ thighs)----------------4 pieces
Chopped onions-----1/4cup
Tomato-----------------1big
chopped ciliantro---2t.s
Cumin seeds--------Few
Cumin powder------1ts
Coriander powder--1ts
Garam masala------1/4ts
Dry coconut powder--2ts
Turmeric------------Pinch
Salt-----------------To taste
Chilli powder------1/2t.s
Procedure:
1. Take chicken cut it into medium size cubes by removing extra fat and wash it.
2. take a pan heat it add oil.
3. add cumin seeds, after they splutter add onions and little bit of salt which aids to cook onions faster.
4. after the onions are half cooked add gingergarlic paste and turmeric and cook it until raw flavor of garlic
goes away.
5. add chicken and cook it untill 80% done by stirring it in constant intervals.
6.Now add chopped tomatos and coconut powder and cook it until tomatos are completely cooked.
7. Add red chilli powder, cumin powder, coriander powder, salt and garam masala.
8. cook for 5 min in simmer by adding little water if you want gravy.
9. After the curry is cooked garnish with ciliantro and serve it...goes well with bagara/ plain rice/chapati.
if you like my recipe plz rate it and follow my blog..thnq
Tuesday, January 28, 2014
Foccaccia con Olive


Foccaccia con Olive (Hearth Bread with Olives)
Ingredients
2 tsp easy blend yeast
500g (1lb) strong white flour
1.5tsp salt
75ml (2.5floz) olive oil, plus additional olive oil to finish
75ml (2.5fl oz) dry white wine (I just used more water)
200g (7oz) pitted black olives (or half a tub of olive pate)
2 tbsp fresh thyme leaves
1 tbsp chopped fresh oregano
Put all the dry ingredients in the bread machine, add the water and olive oil and set the machine to dough.
When it has finished turn it out onto an oiled baking sheet and press into a round, spread the olive pate onto the dough and leave to rise in a warm place for about 30 minutes. Bake in a preheated oven for 30 minutes until golden brown and hollow sounding when tapped underneath. Sprinkle with additional oil if required. Cool on a wire rack.
Spring Rolls
This Recipe is again one of favourites at iftar,the stuffing is so yum...it makes u feel like having more and more.Have made this many times with my mom,its a favorite at my mums and also at my in-laws place.,i dedicate this to my cousin nafay,who has made a special request for me to post this recipe...sorry nafay wasnt able to post this from so many days...finally here it goes..
.JPG)
INGREDIENTS For the Stuffing
- Beans 100grms
- Carrots 100grms
- Cabbage 100grms
- Capsicum 100grms
- Chicken 100grms(boiled and shredded)
- Spring Onions 50grms
- Potatoes 150grms(optional)
- Green chilles 10
- Coriander leaves 1 bunch
- Ajinomoto 1/2Tspn
- Green chilli sauce 1Tspn
- Finely chopped Ginger 1Tspn
- Finely chopped Garlic 1Tspn
- Black Pepper powder 1-2Tspn(if u want it to be spicy)
- Soya sauce 2drops
- Fresh Lemon juice or Vinegar 1Tbspn
- Salt to taste
- Spring roll Flabs or Samosa flabs will also do
Method
- Chop beans,capsicum,green chillies and spring onions finely.
- Grate carrots,potatoes and cabbage.
- Boil the chicken and shred it.
- Take a kadai add 3Tbspns of oil with ginger-garlic pieces and fry for a minute.
- Add spring onions,capsicum,green chillies,beans ,carrots,cabbage,potatoes .
- Add the masalas like ajinomoto,soya sauce,black pepper pwdr and chilli sauce.Also add chicken.
- Fry for 5-7 minutes and add some salt.
- Keep frying and add lemon juice or vinegar .
- Garnish with coriander leaves and cool it.
- Take a spring roll flab and put about 2Tspns of stuffing in the middle and roll it .Seal with water
- Deep fry to golden Brown in colour.
Courgette and Mushroom Pappardelle with Stilton


They promote their 7 core values:
1. Farmison provides home cooks with fabulous foods that would normally only be found in the kitchens of discerning, ingredient-aware chefs.
2. Farmison provides a lip-smacking alternative to the year-round monotony of supermarkets.
3. Farmison constantly changes what it sells to reflect whats in season. When foods are not at their best, we dont stock them.
4. Farmison supports biodiversity in our food chain by promoting rare breed meats and searching out less common fruit and vegetable varieties.
5. Farmison gives small-scale food producers a UK-wide platform to showcase and sell their products, complementing their own local initiatives.
6. Farmison sources food from the UK first and foremost and only chooses imported food if there is no British equivalent.
7. Farmison sells foods produced in a way that respects farm animals, producers and the environment.
I was certainly impressed by the freshness of the vegetables and the variety, they were very well packed too.

Vegetable Papardelle with Stilton
2 large courgettes, diced8 mushrooms, sliced
30g butter
1 tablespoon olive oil
100g Melton Mowbury Stilton, crumbled
250g Soli Pappardelle pasta (courtesy of my lovely hamper from Capricorn Goats Cheese)
Heat the butter and oil in a large pan, add the courgettes and mushrooms and cook for about 10 minutes until the vegetables are soft and golden brown.

Fill a large pan with boiling water, bring to a rolling boil and add the Pappardelle


Look out for more recipes made with my Farmison Veg Box, if you would like to find out more about how you can buy your fruit and vegetables from Farmison there are a variety of boxes available, as well as a range of meats and cheeses.
Disclaimer: This is a sponsored post. I was not required to write a positive review and any opinion expressed is my own.
Quinoa Recipe Stuffed Portobello Mushrooms with Pine Nuts and Raisins
 |
Quinoa stuffed portobello mushrooms are a lovely vegan nosh. |
The stars are tuning their alignment in our favor. After eighteen months on the market (and more than once price reduction along the way) there are rumblings of a house sale. Negotiations are afoot. We are walking on Easter egg shells through the weekend. Monday will bring us definitive news. Send kind and generous thoughts to our buyer. Wish him luck with his bank.
We've been preparing for good news, sorting through books both old and new. Stripping away much of what we've accumulated since our last move. Lugging movies and art books and cookbooks
 off in recycled Whole Foods bags to the used book store in Santa Fe
 . Those things we carry.
Trading media for food.
We took the cash and bought wine, gluten-free flours , olive oil and boxes of tea. Not enough to last through May. On purpose.
Monday, January 27, 2014
Gluten Free Recipes for St Patricks Day
 |
| Warm from the oven "Irish" (not really) Soda Bread Buns. |
I am ignoring the duvet of fresh fallen snow blanketing the world outside my window. I am instead imagining spring. Soda bread and St. Patrick's Day. Daffodils and robin's eggs. The Vernal Equinox is nigh (allegedly). And I am not looking back. I am ready for forward motion. Tee shirts and blueberries.
To celebrate the wee bit of Irish in all of us- be it by blood or kindred spirit- I thought I might gather my gluten-free recipes inspired by Celtic tastes. Yes, Lass, that means potatoes. And cabbage, too. Soda breads, salmon, eggs, cottage pies and spring soups. The Vernal Equinox is just around the corner. Promise. Flower beds will soon be sprouting tiny green shoots.
Add some Van Morrison to your playlist. Raise a glass.
Sláinte!
Read more + get the recipe >>
A Simple Beef Pot Roast with Prep Cook Ragout
 This delicious Beef Pot Roast video recipe is dedicated to all you hungry prep cooks out there. In a restaurant kitchen, real diner breaks are more theory than practice.
There is often not enough time to get everything done, and you cant really tell the chef that you didnt get around to dicing the mushrooms because you were enjoying a nice leisurely supper.
Its not that you starve; someone is usually assigned to cook a "family meal," as its referred to. Leftovers are pulled together and laid out buffet-style to grab when you have a chance. This thankless job is normally done by the youngest cooks, who gain valuable experience, as well as learn profanity in several languages as the results of their labors are critiqued by the older line cooks.
 Prep cook ragout or ragu, is what I call the stewed vegetables that are leftover from the making of stocks, sauces, or from roasting meats. This soft, cooked-to-death "mirepoix" (onions, celery, carrots) is the last resort "family meal" side dish of the "in the weeds" apprentice.
Here, however, these same vegetables make for a really nice topping to our simple, but comforting beef pot roast. Beef, mirepoix, butter, rosemary, salt and pepper…now, thats a recipe any busy prep cook would love. Enjoy!
Ingredients:
Beef Chuck Pot Roast (about 3 1/2 pounds)
1 cup diced carrots
1 cup diced celery
1 cup diced onion
1 tsp dried rosemary
2 tsp salt
1 tsp black pepper
1/2 stick butter
Seasonal Cheese and Leek Flatbread Sandwich

Too few people understand a really good sandwich.James Beard
My Mum probably makes the best sandwiches, she always ensures that there was plenty of filling and that the filling goest right to the edge of the sandwich, the best way to achieve this is by cutting off the crusts. But Im not going to make that kind of sandwich because ever since the early stages of the Great British Bake Off, Ive been hankering to make some flatbreads.I used the recipe for Magic Bread Dough from Hugh Fearnly Whittingstalls River Cottage Veg Everyday.Its an interesting mix of strong and plain flour and something I havent tried before.


Leek and Cottage Cheese Flatbread Sandwich
15g butter
2 medium leeks, trimmed and finely chopped (white and pale green part only)
A couple of sprigs of thyme, leaves only
3 tablespoons of cottage cheese
1 tsp cornflour
50g cheddar
1 large rosemary flatbread
salt and freshly ground black pepper
Melt the butter in a frying plan and add the leeks. Cook gently until softened. Stir in the thyme. Mix the cornflour with some of the liquid from the cottage cheese and add to the pan, add the cottage cheese and warm through. Take off the heat and add two-thirds of the cheese .
Pile the leek and cheese filling onto one half of the flatbread and fold over, sprinkle over the rest of the cheese and place under a hot grill for a couple of minutes until the cheese melts.

Serve with salad
I served my sandwich with a Carrot, Cucumber and Apple Salad with chopped Pistachio nuts

To finish off, Id like to show you the sweet flatbread that I made, using the basic dough a few dried apricots, chopped white chocolate and ground almonds.


Im entering this for No Croutons Required run by Jacqueline at Tinned Tomatoes and Lisa from Lisas Kitchen.

Herbs on Saturday run by Karen at Lavender and Lovage

and also for Simple and in Season, a seasonal challenge created by Ren Behan at Fabulicious Food, this month hosted by Franglais Kitchen

Subscribe to:
Comments (Atom)
